 Your Privacy Choices
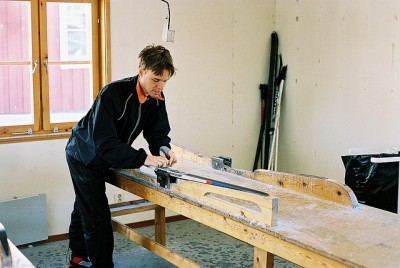
This guide will go through the process of hand tuning your skis. This is different from a tune that a shop will do. A shop tune is done with a series of machines. A ceramic stone will grind the base flat (putting a pattern in the base called structure, of which many combinations are available), an edging machine will put side and base bevels on the ski, and a waxing machine is usually used to wax the skis.
The base grind should be done once a season, or as often as is needed (determined by how beat up the bases are), and the machine tune for the edges should be done as it is needed (when edges are burred, rounded, or otherwise completely destroyed).
As long as your bases are flat, a proper hand tune is superior to a shop’s machine tune in every way. Edges typically need to be tuned or at least touched up after every three to five times skiing in order to maintain maximum sharpness. Bases should be waxed at least every other time out, but usually a race ski should be waxed multiple times every time it is skied on. Wax serves more purpose than just making the bases slick. Multiple waxing sessions will actually allow the wax to soak into the base, creating a stronger, faster, healthier base for your skis.
Tools list:
- Vise
- Ski brake retainer or thick rubber band
- File Guide
- Base bevel guide
- Sidewall stripper (planer)
- File
- Second Cut File
- Diamond Stone (coarse and fine)
- Rag
- Waxing Iron
- Wax (temperature specific wax is good to keep around.)
- Brass brush
- Nylon brush
- Plastic scraper
For Edge Bevel: (1, 2, and 3 degree side bevels are most popular. When you get above 3 degrees you will be sacrificing edge life for increased edgehold. This angle will determine essentially how sharp your skis are. If you angulate a lot (put a lot of force into the ski) go with a 2 or 3 on the side. If you do not use significant angulation you should stick with a 1. Use a FILE GUIDE – not one of those multi-tuner tools – they suck – all of them. By using a real guide, you can use any file you like. I have had the best results with Swix and Bludan files (Reliable Racing). Winning edge and Toko guides are inexpensive and very easy to use.
Base Bevel: This determines how soon the edge will hook up when you are transitioning into a new turn. Anything 1 degree or less will do. This will let the edge catch quite fast at the top of the turn, so there is no guessing if they are going to catch or not. If you want them to catch sooner you will want a .5 degree bevel. Try to stay away from a 0 degree base bevel. If you use anything over 1 degree, you will have edges that catch very late in the turn, and unless you are angulating a lot, you will be skiing on the base of the ski most of the time.
The Edge Guide
New skis:
 Many recreational skiers will argue that you do not have to tune a new ski. This philosophy is a good one unless you really know how to tune a ski. If so, you should follow the steps in this guide before you ski the skis and at least give them a light tune. Waxing is something that you should not compromise on, and new skis should be waxed at least 3 to 5 times before they ever see snow. Race skis usually require a base grind (unless the race room ships them prepped), a hand tune, and 10+ coats of wax.
Process:
Put your skis onto the vice with the bases facing upward. Scrape any excess wax from the base with the plastic scraper, and proceed to use the brass brush to get any remaining wax off the base. Wipe the ski clean with a rag and you should be ready to attack the edges.
Base Bevel:
Decide what bevel you will be using on your skis. It is best to have this bevel preset by a shop tune and to only be touched up when you have rounded the edge, or there are significant burrs on the edge. The base edge should not need to be done very often, and should not be done often, because excessive base edge tuning will result in a base-high ski, in which the edges to not touch the snow when the ski is flat on the snow.
Note: Before the process below, you may want to skip ahead to the side edge sharpening and use your side bevel and diamond stone to get rid of any burrs.
Put your ski into the vice with the base facing away from you (People will tell you to always work tip to tail, but this only matters if you’re really good with your left hand, otherwise you will never tell the difference between the edges that were tuned from the tip or from the tail.). Select you base edge bevel guide, and put the file into it with the tail facing up and away from you (in case a tail is not present on your file run your hand up and down the file to determine which direction it should pass in; you should be pulling the file toward you in the direction that offers the most resistance; usually if you run the file the wrong way it will feel slippery and burr your edge). Hold the guide on the base and pull toward you in long even passes down the ski. Very few passes should be needed, but you will be able to tell when the edge is sharp by pushing your hand down across the edge (parallel to the base).
Note: If burrs are present on the base edge you will have to use a diamond stone before using your file. Insert the diamond stone into your base guide, and run it along the base at your selected bevel. Diamond stones are multi-directional, so do not worry about running it the wrong way on the ski edge. Make sure you wet the edge or make a solution of alcohol and water as to not damage the edge or the stone during this process. Start with a course stone, and work down to a fine stone, or until burrs are not present. At this point you can start with the file as was stated above.
Side Bevel/Sharpening:
Strip the sidewalls if necessary, to gain full access to the edge. This will not hurt a cap ski. Companies actually make square of round blades depending on the type of ski you are planning on using the tool with. Usually cap skis like Atomic recommend the round blades, while sandwich skis seem to do well with the square blades. Run the tool along so that the blade is cutting just above the edge. Many people like to smooth the sidewall after this process is done, but if done properly, you should be left with a very smooth surface.
After stripping the sidewall (usually done only once or twice a season) use a diamond stone with your selected file guide to remove burrs and rust. Wet the side edge (water or a mix as described above) and place your diamond stone on your side edge file guide that you have selected. Run the file guide so that the diamond stone is in contact with the edge and will remove any burrs. The smooth surface of the guide will run along the base. The stone will sit on the top side of the guide, and pass along the edge (same for a file).
Once your edge is burr-free you are ready to start using your file. Place the file on the guide so that the tail is pointing away from you (see base bevel section for how to determine the direction of use for your file). Angling the file on the guide is usually a good tactic. Getting the feel for this process with take some practice. Pull the file/guide along the ski in smooth, even passes with your dominant hand. You will be removing material, as well as sharpening the edge. Make sure you are getting edge off the ski, but also maintain contact with the file guide and the base. The pressure should never be so much on the edge that you lose your angle with the file guide/base. Put the pressure against the base, and lightly on the edge (just enough to remove material). When you have made your initial passes with your main file, switch to your second cut file and lightly go over the edge. This will get rid of any burrs that the more aggressive files can leave. When the sharpness of the edge feels even (and sharp enough to cut you) you should be all set. This is a good point to use your fine diamond stone (wet) to clean up any burrs left over from filing. This will leave a nicely polished edge.
At this point you should be done. Wipe the edge with a rag every so often to make sure you are not grinding the filings into the edge. Your first tune may take a LONG time. Usually if an edge goes without a tune it becomes round – which takes a long time to correct. When you are done; make sure that the edge feels like a freshly sharpened hockey skate. This type of tune will hold on ANYTHING. On ice it will wear to a normal edge after a day or two of hard skiing, but it will get you where you want to go in any kind of conditions.
Try to learn the factory specs or manufacturer recommended specs for you edges for you skis. Many manufacturers will send your skis already set at the angle that they need to be set at, while others will send them at 0/0 and rely on the shop or user to tune them into spec.
The Waxing Guide
 Waxing is a very important procedure for your skis. Keeping your bases full of wax, and properly cared for can make a very big difference between a well cared for ski versus a poorly cared for ski. Of course a well cared for ski will slide better, that is assumed. It will also have a stronger base, and will not be prone to getting damaged by “base burn.” When ironing the ski, make sure that your iron is set to the proper temperature. There is really no substitute for a real waxing iron (as sold by Swix) but if you are not using a waxing specific iron, be sure that you are heating the iron so that it is just hot enough to melt the wax. If it is too hot, you risk damaging the base.
Brushing:
After filing, start out by using your brass brush to brush your bases to remove dirt, wax, leftover edge filings, and anything else that you picked up along the way. Wipe the ski down with a rag to get all of the debris off the base (assume facing up in your vice).
Cleaning Coat:
Begin by heating your iron to a low temperate, and use some inexpensive wax (Swix all purpose is good for this) to clean the base. This is done by dripping and ironing the wax onto the ski. Before it has cooled use your plastic scraper to get this wax off your ski. It will serve to clean out the rest of the debris in the base. More than likely you will see black specs and other dirt-like particles in the wax that you scrape off. Throw this wax away as it has served its purpose.
Warm-Scrape Coat(s):
This is usually the process that you will use for your primary coats of wax. Crayon warm (CH8 or 10 on the Swix scale is a good choice –or- use base prep wax) wax into the base (if using a cold wax it may need to be warmed up slightly to do this). Hydrocarbon is the best choice for prepping your base. Fluorocarbons in high volume can dry out your base. Before ironing drip some wax down the ski as well. Iron the wax into the base. Try to keep your passes as an even speed, and try to get the surface of the wax smooth and even. Let this cool off to where it is not shiny anymore, and scrape the ski with your plastic scraper. This will get any excess wax off the top of the ski base (the rest soaked into the base). Repeat this process several times for new skis or race skis. For routine waxing I will do this once or twice before putting on my final coat of wax. Before races it is common to go through this process 10+ times.
Final Coat:
Your final coat of wax is the coat in which you should be worried about temperature, as for the other coats the warm wax soaks in and melts much better. Crayon and drip this wax. This coat can be HF, LF, or CH waxes at any temperature. The goal for this coat is to get it thin, smooth, and even down the length of the ski. Too much wax and too little wax can be slow. When this coat has cooled, use your scraper to get most of the excess wax off the base. Use your nylon brush to go over the final coat and smooth it out even more. Horse hair also works very well in this instance, but the brushes can be VERY expensive. If you are not racing a horse hair brush can be overkill. Finally make sure the base is clean (wipe it down with a CLEAN rag if it is needed), and you should be ready to ski.
Note: For transportation purposes it can be useful to keep a thick coat of wax on your base/edges until you get to the mountain. At the mountain it is very easy to throw in your brush and scraper and get the excess wax off before you embark on your day of skiing. Just lean the ski against a ski rack, wall, or in a corner and have at it.
Article republished with permission from www.epicski.com.
Photo: (feature) Oskar Karlin, (new skis) Snick Clunk, (waxing) a2c_s_1980