 Your Privacy Choices
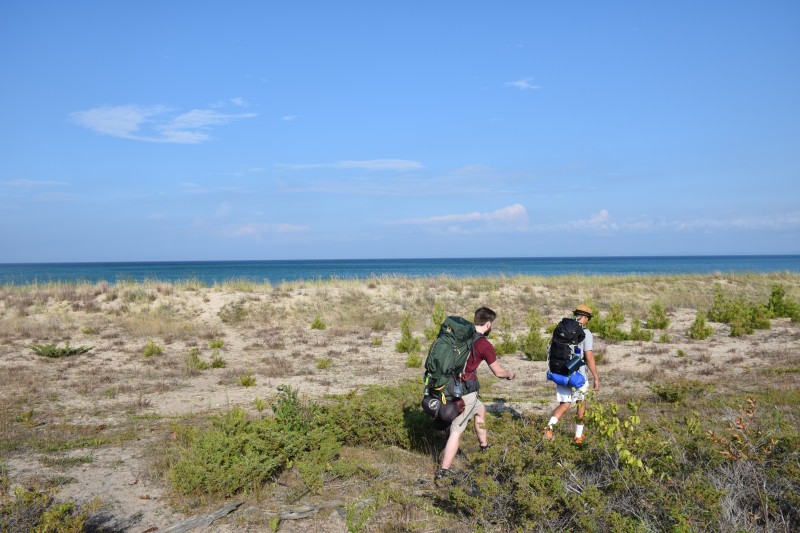
Be prepared for your next weekend backpacking trip by following along with our gear checklist.
I love lists almost as much as I love backpacking. Put the two together, and I end up being pretty well prepared for each trip. I spent Labor Day weekend this year on Michigan’s North Manitou Island–a location reached by an hour-long ferry ride. If you forget something, there’s no car nearby or store within walking distance. This isn’t to say it’s an extreme hiking environment by any means, but more so that if you forget something at home, you’re out of luck.
As a 23-year-old who spent almost every summer of childhood at an outdoor summer camp, I’ve been on a fair amount of trips—and have made a fair amount of lists. Below is a (very long) checklist with notes of my recommended basic items for a weekend trek, as well as some specific gear I’ve found to be extremely useful. I’ve linked out to reviews of some of the products I’ve included on the list for those who would like detailed information before considering a purchase. Feel free to chime in with comments regarding any gear I may have forgotten, or something you’ve found handy on your own trips. Keep in mind, the list is geared toward those who will be backpacking during warmer months, since that’s my area of expertise. To read through quickly, just check out the underlined gear and skip over the notes.
Gear
- Pack: This is by far the most important item. It houses all of your gear and can make or break your trip depending on how much time you’ve put into researching specific fit, size, organization, strap comfort, etc. Because my trip was an easy two nights, I went with an affordable option—High Sierra’s Lightning 35 Frame Pack made specifically for women. I’m 5’11” and found this size to work well. If you’re on the shorter side, check out the Piton 30, which my 5’2″ friend used and said worked really well with her height. My boyfriend used Mountainsmith’s Lariat 65, which was definitely too big for the two-night stay, but would be great for a week or longer. He simply wasn’t going to shell out money for a smaller pack, when the Lariat was already an option. If you’re willing to spend some cash, I’ve had great experiences using Osprey packs for week-long trips, all of which featured tons of strap comfort. Again, it all depends on personal preference, but take your time trying on a number of packs, considering its features and where you’ll be using it, and asking sales representatives plenty of questions. Don’t forget a rain cover or extra poncho for your pack.
- Tent: When purchasing your larger items, try to keep in mind that you’ll be carrying all of them on your back. Does your tent fit in your pack’s body or will it have to be attached to straps on the bottom? If your sleeping bag will also be attached to the bottom, will both fit within the straps? All important questions. Big Agnes loaned me an Angel Springs UL2 tent for review, which is super light and packed away incredibly small. I was grateful for its small size during the day while hiking, but could have used a bit more room at night. It rained during our trip, and my boyfriend and I had a hard time fitting both of our packs in the tent. It was doable, but maybe not for taller folks. I would go with a bit larger size in the future for the sake of comfort. But if you’re going for a minimalist approach, the Angel Springs UL2 was the perfect option. Don’t forget a tarp for under the tent—it can be used as a picnic blanket prior to going to bed.
- Sleeping Bags/Pads: The biggest thing to consider when purchasing a sleeping bag is the temperature you’ll be camping in. Again, we went with the Lost Lake SL 30 and the Big Pine (35) from Big Agnes. Simply put, they’re great bags and will last you a really long time—also super lightweight and roll up very, very small. Our pads, the Q-Core SL and Insulated Air Core, were also from the brand. While the pads also pack up really small (and easily), I think I’d go with a simple roll-up foam mat in the future. The pads were comfortable but it was easy to slide off them in the night, which woke me up often.
- Lantern/Flashlight: Whether it’s a lantern, flashlight, or headlamp, it’s smart to have at least two and either fresh batteries, or some spare ones packed. We had plenty of light with one for each of the four people on the trip. Blackfire’s Clamplight is a lightweight, traditional flashlight, but the clamp on its end allowed for it to be easily attached to my pack. I also used Bracketron’s SmartLantern, which is absolutely tiny and great for minimalist hikers, as well as a borrowed headlamp. It also easily transitions into a flashlight. Lastly, I used a beast of a lantern (referencing features, not weight—it’s pretty light) made by Goal Zero—the Lighthouse 250 Lantern—it not only provides tons of light on a number of settings, but it charged my iPhone 4S (yes, still rocking that) in less than an hour from its starting point at zero percent battery. Used with the Gear Ties from Nite Ize, I easily attached the lantern’s hook to the loop in the top of my tent. It made playing euchre a bit easier. If I didn’t already have the lantern, I would have packed a solar panel of some kind. I’ve used Goal Zero’s Guide 10 Plus Solar Kit with good results. Don’t forget the accompanying cord for your phone.
- Knife/Multi-Tool: I used a SOG knife meant for skinning deer to spread peanut butter on a bagel. It was useful.
- Map/Compass/GPS: It’s good to have all three.
- Whistle/Two-Way Radio
- Watch
- Rope: For hanging food, trash, or drying clothing.

Chaco’s Azula Mid Waterproof Boot in Bungee Regular.
Clothing & Personal Items
- Hiking Boots: Once again, this is all based on personal preference. Spend your time shopping and ask plenty of questions. Also, don’t forget to wear the shoes around before your first big trip—blisters will appear otherwise. I wore Chaco’s Azula Mid Waterproof boots, but have also had good luck with La Sportiva’s Thunder III GTX boots. For men’s shoes, my boyfriend opted for a low version, Chaco’s Trailscope, and ActionHub writer Marty Basch gave a positive review to the Lowa Renegade LL Mid Boots.
- Slip-on Shoes: Whether it’s a pair of water shoes or just some slip-on sandals, having something other than hiking boots is essential, especially if you’re near the water. I packed a pair of water shoes, but should have gone with sandals instead. I ended up with a few blisters after miles of hiking and would have liked something that didn’t rub against my heel, namely for walking around camp.
- Hiking Pants/Shorts/Thermal Pants: To save room, buy a convertible pair. Rather than spending more money though, I used what I had—Duluth’s DuluthFlex Dry on the Fly—they don’t zip off into shorts, but they do roll up into capris. To accompany the pants, I packed a simple pair of loose fitting athletic shorts. For night, I packed a pair of thermal leggings.
- Hiking Shirts/Jacket: I just went with a few athletic tank tops, a breathable STIO hiking shirt, pull-over thermal sweatshirt, and a rain jacket. Nothing too fancy, just make sure you’re dressing for the conditions. If it’s colder, pack thermal layers. Even if you have a rain jacket, pack a few of those dollar store ponchos—they come in handy.
- Undergarments/Socks: The right kind of socks will prevent blisters. I gravitate toward Farm to Feet, FITS, and also tested out a new pair from Polygiene, which includes an antimicrobial technology that allows you to wear your clothes longer between washes.
- Bathing Suit/Towel: For if you’re near water. Try to pack a fast-drying towel. I used this super technical towel with rainbow frogs on it that I’ve had since fourth grade. And by technical, I mean not at all.
- Medicine Cabinet: Sunscreen, bug spray, lip balm with SPF, first aid kit, toilet paper/biodegradable body wipes (plus shovel), biodegradable soap, toothpaste, toothbrush, hat, necessary medications, sunglasses, hand sanitizer, trash bag, ziploc bags, etc.
- Camping Passes/Permits/ID/Cash/Credit Card: All are great to have on hand for emergencies.

Pack plenty of energy bars and at-hand food in case your planned meals don’t work out.
Kitchen Kit & Food
- Kitchen Kit: Should include sporks, hot pad, bowls, pots, etc. It will all depend on what food you pack and what meals you plan to cook. ActionHub writers Andy and Tami McDaniels positively reviewed the Gourmet Kitchen Set 11 from GSI Outdoors. I’ve found that it’s easy to take a simple camping kettle to heat water for coffee (just buy the prepackaged bags), and also use it for heating noodle bags, etc. Pack a sponge and small towel or wet wipes for cleaning.
- Stove/Fuel: Make sure to pack extra fuel and lighters.
- Water Bottles/Mugs: Make sure to have at least two full water bottles at all times, as well as a mug for hot beverages. I used the Nathan Sports BigShot Narrow Mouth water bottle and another from AVEX. If you want better coffee than what comes in the prepackaged bags, check out the Melitta Pour-Over Travel Mug Set.
- Water Filter: Our SteriPen failed us for reasons that are still unknown (yes, we used the correct batteries), but luckily we had my friend’s dad’s water bottle with a built-in filter from 20 years ago. It took plenty of squeezing to fill all our bottles, but it did the trick. Always have a back up.
- Food/Snacks: Whether you go for freeze-dried meals or want to cook on a stove, make sure you have plenty of other food as backup. We used a few Mountain House meals, but one of them didn’t turn out because of water failing to heat up enough, so I relied on energy bars as dinner. Pack more than you need. For weekend trips, I pack plenty of tortillas, bagels, peanut butter, jelly, hard fruit, energy and protein bars, crackers, noodles, turkey jerky, and most importantly, tiny boxes of wine. Because of severe thunderstorms, our group was almost stuck on the island for an extra day, so plan to pack additional food wherever you’re backpacking.
Once again, feel free to comment with anything I may have missed and hopefully this provides a bit of insight in preparing for your next backpacking adventure.
Images by Ariel Black. Last image courtesy of Beautydish/iStock
